
You can create a database in Snowflake using either the web UI or the CREATE DATABASE DDL statement.
Post Content
Who can create a Database in Snowflake?
Creating Database in Snowflake using Web UI
Creating Database in Snowflake using SQL Command
Who can create a database in Snowflake?
The following users or roles can create a database:
- Only users with the
CREATE DATABASEprivilege can create databases in Snowflake. By default, only theSYSADMINrole has this privilege. - The
ACCOUNTADMINrole is the highest-privileged role in Snowflake and has all privileges, including theCREATE DATABASEprivilege.

Creating Database in Snowflake using the Web UI
Here are the steps on how to create a database using the Snowflake web UI:
Step-1: Log In to your Snowflake account using your credentials.
Step-2: Click on the Data tab, then select Databases.
Note: Before creating the database, ensure that you have selected an appropriate role.
Step-3: Click on the + Database button.

Step-4: Assign a database name and provide a comment if you would like.

Step-5: Database created successfully.
Creating Database in Snowflake using SQL Command
To create a database in Snowflake using SQL, follow the steps below.
Step-1: Add a new SQL Worksheet.
Step-2: Write the SQL statements below and execute them one by one. See the two different ways to create a database in Snowflake
CREATE DATABASE DEVDBSQL1;

OR

CREATE OR REPLACE DATABASE DEVDBSQL2
COMMENT = 'This is my DEV DB 2 for testing'
DATA_RETENTION_TIME_IN_DAYS = 30;
Note:
- CREATE OR REPLACE DATABASE: This part of the command specifies that you want to create a new database or replace an existing one if it already exists. If a database with the same name already exists, it will be replaced with the new configuration.
- Database name: Must be unique for your account and must start with an alphabetic character. Cannot contain spaces or special characters unless the entire identifier string is enclosed in double quotes.
- Comment: An optional description of the database.
- Data retention time in days: Optional, The number of days for which data in the database will be retained before being automatically deleted.
Step-2: See the screenshot below for your reference.

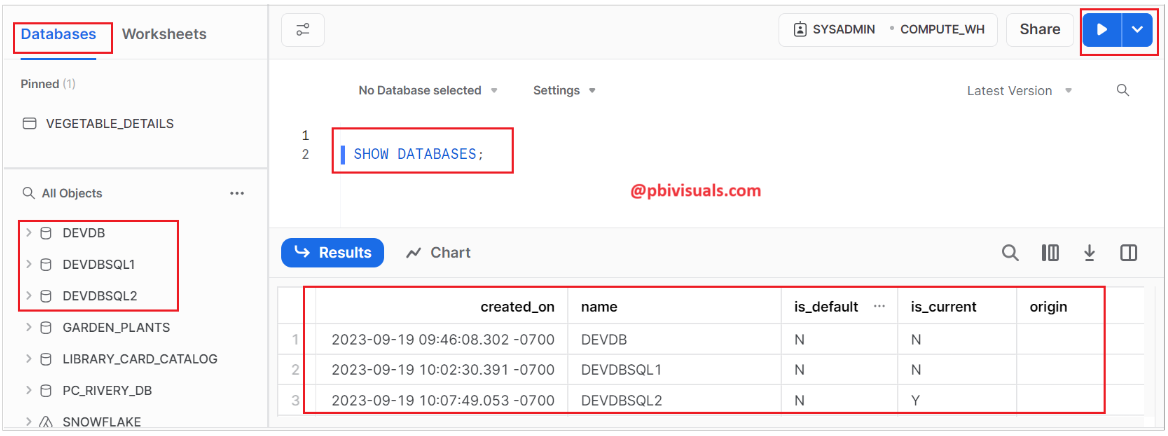
Step-3: Afterward, you can verify the creation of databases by executing a query to view a list of databases:
SHOW DATABASES;
Thank you for reading this post, and I hope you enjoyed it!
![]()