
In this blog post, you will gain a comprehensive understanding of how to load data from an Azure Blob storage container into a Snowflake table. To achieve this, please follow all the steps outlined in the post content below.
Post Content
Create a Table in Snowflake for Data Load
Configuring an Azure Container for Loading Data
Create a Cloud Storage Integration in Snowflake
Grant Snowflake Access to the Storage Locations
View the data before loading it into the table
Copy command to ingest data from Azure
Create a Table in Snowflake for Data Load
Step-1: Log in to the Snowflake account and Add a new SQL Worksheet.
Step-2: To select the database and schema in which you want to create a table, write the following SQL query and execute it.
Run the following SQL queries one by one.
USE ROLE SYSADMIN;
USE DATABASE DEVDB;
USE SCHEMA PUBLIC;

Step-3: Now, write a CREATE TABLE statement to create a table and execute it.
create or replace TABLE DEVDB.PUBLIC.EMPLOYEES (
EMP_ID NUMBER(38,0) NOT NULL autoincrement,
FIRST_NAME VARCHAR(50),
LAST_NAME VARCHAR(50),
SALARY NUMBER(10,2),
primary key (EMP_ID)
);
Step-4: Table created successfully.

Configuring an Azure Container for Loading Data
Step-1: Login into the Azure Portal https://portal.azure.com/
Step-2: Go to the storage account, create a container, and upload the file below to it.
Download sample file form here: empData.txt
- Storage account name: sdevaccount
- Container name: snowflakecontainer
- File name: empData.txt
Note: If you are unsure about how to upload a file into a storage account, please refer to this post.

Create a Cloud Storage Integration in Snowflake
A storage integration is a Snowflake object that stores a generated service principal for your Azure cloud storage, along with an optional set of allowed or blocked storage locations (i.e., containers).
This feature allows users to eliminate the need for providing credentials when creating stages or loading data.
Note: Only account administrators (users with the ACCOUNTADMIN role) or a role with the global CREATE INTEGRATION privilege can execute this SQL command.
Now, follow the steps below:
Step-1: Switch to ACCOUNTADMIN Role.
Step-2: Here is syntax for integration object for external stage.
CREATE STORAGE INTEGRATION <integration_name>
TYPE = EXTERNAL_STAGE
STORAGE_PROVIDER = 'AZURE'
ENABLED = TRUE
AZURE_TENANT_ID = '<tenant_id>'
STORAGE_ALLOWED_LOCATIONS = ('azure://<account>.blob.core.windows.net/<container>/<path>/', 'azure://<account>.blob.core.windows.net/<container>/<path>/')
[STORAGE_BLOCKED_LOCATIONS = ('azure://<account>.blob.core.windows.net/<container>/<path>/', 'azure://<account>.blob.core.windows.net/<container>/<path>/') ]
Explanation:
- <integration_name>: is the name of the new integration.
- <tenant_id>: is the ID for your Office 365 tenant that the allowed and blocked storage accounts belong to.
- <container>: is the name of a Azure container that stores your data files.
- The STORAGE_ALLOWED_LOCATIONS and STORAGE_BLOCKED_LOCATIONS parameters allow or block access to these containers, respectively, when stages that reference this integration are created or modified.
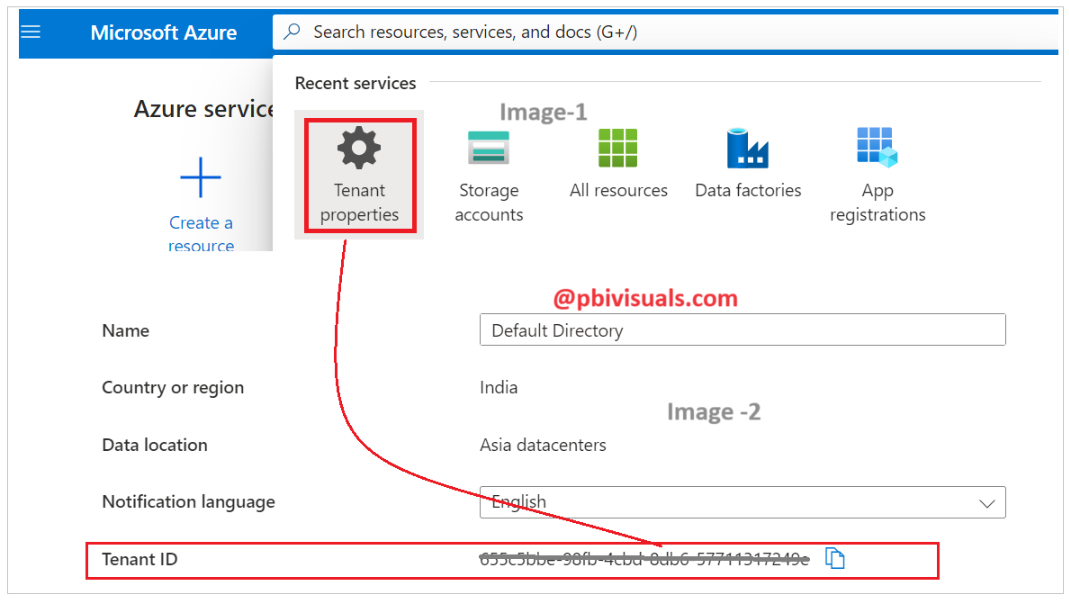
Step-3: Find your tenant id, Go to the azure portal, searching for Tenant properties, and opening it, you will find your tenant ID there.
Step-4: Now, replace your storage account, container name, and tenant ID in the following SQL query.
create or replace storage integration azure_storage_integration
type = external_stage
storage_provider = azure
azure_tenant_id = '655c5bbe-98fb-4cbd-8db6-57711317249e'
enabled = true
storage_allowed_locations = ('azure://sdevaccount.blob.core.windows.net/snowflakecontainer/');
- Integration name: azure_storage_integration(You can assign any name)
- azure_tenant_id: Replace with your tenant ID
- Storage account: Replace with your storage account name
- Container name: Replace with your container name
Storage Integration created successfully, refer to the image below .

Grant Snowflake Access to the Storage Locations
Step-1: Now execute the DESCRIBE INTEGRATION command to retrieve the consent URL.
DESC STORAGE INTEGRATION azure_storage_integration;
Step-2: After executing the query above, it will return 7 rows. We will focus on rows number 6 and 7.

Azure Consent URL:
Copy the Azure consent URL(Refer above image) and paste it into another tab of browser. And Press enter key.
After that, you will see a permission requested window. Please provide consent to allow Snowflake access to the respective container and storage account that you have granted access to.
Check the consent box and then click on the accept button.

After you have consented, it will navigate to your Snowflake portal screen. This means your consent was authorized successfully.

Azure Multi tenant app name
Navigate to the Azure storage account, select Access Control (IAM), and click on the + Add button, and select Add role assignment.

After that, in the Role section, search for Storage Blob Data Contributor, select it, and click Next.

Then click on Select member, type a few characters of your Azure multi-tenant app name (as referenced in row number 7), select the app name, and click on Select. After this, click on Review + assign.

Roles have been assigned successfully. You can verify this by navigating to the storage account, accessing the Access control (IAM) section > Role assignments.
Create File Format Objects
Define a file format that specifies how your data is formatted in the Azure Blob Storage files.
Step-1: Let’s take a look at a sample file. The file format is TXT, and the data is in comma-separated format.

Step-2: Execute the following SQL query to create a file format.
- Type: This specifies the file format type. In this case CSV will work for TXT file.
- Field Delimiter: It specifies the field delimiter used in the files. Here data are separated by commas.
- Skip Header: This line specifies the number of header rows to skip in the files.
CREATE OR REPLACE FILE FORMAT blob_file_format
TYPE = 'CSV'
FIELD_DELIMITER = ','
SKIP_HEADER = 1;

Create an External Stage
External stages are used to access and manage data files from external sources in Snowflake, such as Amazon S3, Azure Blob Storage, or Google Cloud Storage.
Create a stage object to specify to Snowflake where to retrieve the files from-
CREATE OR REPLACE STAGE my_azure_stage
STORAGE_INTEGRATION = azure_storage_integration
URL = 'azure://sdevaccount.blob.core.windows.net/snowflakecontainer/empData.txt'
FILE_FORMAT = blob_file_format;
Explanation:
- STORAGE_INTEGRATION: provide the name of the storage integration we created earlier in Snowflake.
- URL: Provide the URL with file name.
- FILE_FORMAT: Provide the name of the file format we created earlier in Snowflake.

View the data before loading it into the table
Before loading data into the table, you can execute the following query to check the file data.
The placeholders $1, $2, $3, and $4 represent the values of the first four columns in the table.
Note: In our file format, we skipped the file header, that’s why we are using these placeholders instead of actual column names.
Select $1, $2, $3, $4 from @DEVDB.PUBLIC.my_azure_stage;

Copy command to ingest data from Azure
The COPY INTO command is used to load data from external files, such as CSV, TSV or Parquet files, into a Snowflake table.
Execute the commands below one by one-
Copy into DEVDB.PUBLIC.employees
from @DEVDB.PUBLIC.my_azure_stage;

Select * from employees;

Data has been successfully loaded into the Snowflake table.
Thank you for reading this post, and I hope you enjoyed it!
![]()