
In this blog, you will gain an understanding of Time Travel in Snowflake, data retention period, and SQL extensions for Time Travel. Please follow the post content step by step below.
Post Content
Data Retention Period for Time Travel
- For Standard edition
- For Enterprise edition(or higher)
- Check, create and alter data retention
SQL extensions for Time Travel
Introduction to Time Travel
Snowflake Time Travel is a feature that enables accessing historical data (i.e. data that has been changed or deleted) at any point within a defined period.
It serves as a powerful tool for performing the following tasks:
- Restoring data-related objects (tables, schemas, and databases) that may have been accidentally or intentionally deleted.
- Duplicating and backing up data from key points in the past.
- Analyzing data usage/manipulation over specified periods of time.
To use Time Travel, you can use the AT or BEFORE keywords in your SQL queries. The AT keyword will return the data from the specified point in time, while the BEFORE keyword will return the data from before the specified point in time.
Data Retention Period for Time Travel
A key component of Snowflake Time Travel is the data retention period and the retention period specifies how far back in time you can go to access that data.
When data in a table is modified, including deletions or dropping an object containing data, Snowflake preserves the data’s state before the update.
The data retention period specifies the number of days for which this historical data is preserved and, therefore, Time Travel operations (SELECT, CREATE … CLONE, UNDROP) can be performed on the data.
The standard retention period is 1 day (24 hours) and is automatically enabled for all Snowflake accounts.
For Snowflake Standard Edition, the retention period can be set to 0 (or unset back to the default of 1 day) at the account and object level (i.e. databases, schemas, and tables).
For Snowflake Enterprise Edition (and higher):
- For transient databases, schemas, and tables, the retention period can be set to 0 (or unset back to the default of 1 day). The same is also true for temporary tables.
- For permanent databases, schemas, and tables, the retention period can be set to any value from
0 up to 90days.
Note: Once the defined period of time has elapsed, the data is moved into Snowflake Fail-safe and these actions can no longer be performed.
You can use the following SQL statement to check the default retention period for Time Travel on a table
Show tables like 'employees';

Create a database with a 30-day retention period-
Execute the following SQL statements one by one.
CREATE DATABASE demoDB
DATA_RETENTION_TIME_IN_DAYS = 30;

Show databases like 'demoDB';

Create a table with a 30-day retention period-
CREATE OR REPLACE TABLE demotable (
column1 STRING,
column2 INT,
column3 DATE
)
DATA_RETENTION_TIME_IN_DAYS = 30;

Show tables like 'demotable';
Modify the existing table’s retention period-
Alter the existing table to increase the Time Travel retention period to 30 days.
ALTER TABLE employees
SET DATA_RETENTION_TIME_IN_DAYS = 30;

SHOW TABLES LIKE 'employees';
What will happen if you exceed the data retention period of more than 90 days?
Default data retention period can be set to any value from 0 up to 90 days. If you exceed this you will get an error.
Note that extended data retention requires additional storage which will be reflected in your monthly storage charges.
CREATE OR REPLACE DATABASE demoDB
DATA_RETENTION_TIME_IN_DAYS = 100;

SQL Extensions for Time Travel
1- Show tables history:
When you execute this command, Snowflake will return a result set containing details about the tables and their historical versions, including information such as the table name, schema, version, and the timestamp at which each version was created or modified.
Show tables history ;

You can also check the same for the database and schema.
Show databases history;
Show schemas History;
2- OFFSET Clause
The following query selects historical data from a table as of 5 minutes ago.
SELECT * FROM EMPLOYEES AT(OFFSET => -60*5);
For example, we updated the employee ID 2, changing the first name from 'Jane' to 'Mark'.
Update EMPLOYEES set First_name=’Mark’ where Emp_id=2;
Select * from employees;
Now execute below query
SELECT * FROM EMPLOYEES AT(OFFSET => -60*5);

You can view the image above using the OFFSET clause to select historical data from a table as of 5 minutes ago, and during that time, we did not update the record.
Now execute same query for 2 min:
SELECT * FROM EMPLOYEES AT(OFFSET => -60*2);

Now you can see the updated data. I hope you understand how you can access the historical data using OFFSET.
3- AT Clause
The following query selects historical data from a table as of the date and time represented by the specified timestamp.
Syntax:
SELECT * FROM my_table
AT(TIMESTAMP => 'Fri, 01 May 2023 16:20:00 -0700'::timestamp_tz);
Example:
Step-1: In the query below, we have updated the first name for emp_id 4, it was previously 'Emily'.
update employees set first_name=’Emeely’ where emp_id=4;
select * from employees;

Step-2: To select data from a specific timestamp in table, execute the following query:
SELECT * FROM employees
AT(TIMESTAMP => '2023-09-28 02:18:35.964 -0700'::timestamp_tz);
You can see the below image, it is showing that the first name for emp id 4 is Emily, but if you remember, we updated it to Emeely , The reason is that we selected the data at a specific timestamp, and at that time, we had not yet updated the data.

This can be useful for historical data analysis or for seeing how the data in the table looked at a specific point in time.
4- Before Clause
Step-1: Count of number of rows in employee tables is: 100
Select count(*) as count from employees;

Step-2: Delete one record from the table and Copy the Query ID for future reference.
Delete from employees where emp_id=100;
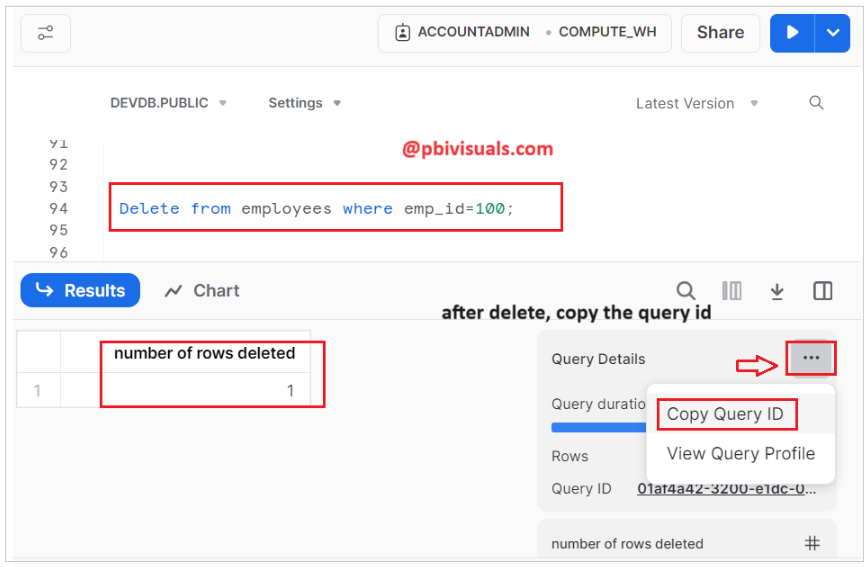
Step-3: After deleting, check the count of records in the employee table.
Select count(*) as count from employees;
Output: 99
Step-4: Now, use the query below to view the count of records in the table before performing the delete step. Use the Query ID provided in delete step.
SELECT count(*) as count FROM employees
before(STATEMENT => '01af4a42-3200-e1dc-0005-e93a00087036');
As you can see in the image below, after deleting a record, the record count in the table has reduced to 99. In the query above, we provided the Query ID for the deletion step, indicating our interest in viewing the data before the delete statement, when the count was 100.

Cloning Historical Objects
The CLONE keyword in the CREATE command for a table, schema, or database to create a logical duplicate of the object at a specified point in the object’s history.
1- CLONE Table
The following CREATE TABLE command creates a clone of a table with all records as they existed prior to the execution of the specified statement:
Syntax:
CREATE TABLE clone_table_name CLONE original_table_name
BEFORE(STATEMENT => ‘Query ID’);
If you recall, before deleting a record in the employee table, we had 100 records in the table. If you wish to view all the records before executing the delete statement, you can create a clone of the table.
However, to do this, you will need the Query ID for the delete step because we want to capture the state of the table before the delete operation.
CREATE TABLE restored_table_employee CLONE employees
BEFORE(STATEMENT => '01af4a42-3200-e1dc-0005-e93a00087036');

Select * from restored_table_employee;

Now you can see the above image, the clone table has been created with all records before the execution of the delete query.
You can try the same thing with schema and database:
The following CREATE SCHEMA command creates a clone of a schema and all its objects as they existed 1 hour before the current time.
CREATE SCHEMA restored_schema CLONE my_schema AT(OFFSET => -3600);
The following CREATE DATABASE command creates a clone of a database and all its objects as they existed prior to the completion of the specified statement:
CREATE DATABASE restored_db CLONE my_db
BEFORE(STATEMENT => '8e5d0ca9-005e-44e6-b858-a8f5b37c5726');
Thank you for reading this post, and I hope you enjoyed it!
Refer post: Fail-safe in snowflake
![]()