In this blog you will understand How to connect a SharePoint List to Power Apps?
Similar questions related to this post-
Things to be cover here-
- Upload Excel file data to Share Point List
- Connect a SharePoint List to Power Apps
Following these steps-
Step-1: Login into Power Apps maker Portal with your work or school mail id- https://make.powerapps.com/
Note: Power Apps doesn’t not support personal mail id, you have to sign in with you official mail id or Id assigned by your school.
Step-2: Now click on Create tab > choose Blank app > Click on Create

Canvas Apps
Step-3: Give app name and choose the App format > Click on Create button.

Create canvas app
Step-3: Now you can see the blank canvas power apps screen.

Canvas App Screen
Upload Excel Data to SharePoint List and Connect a SharePoint List to Power Apps
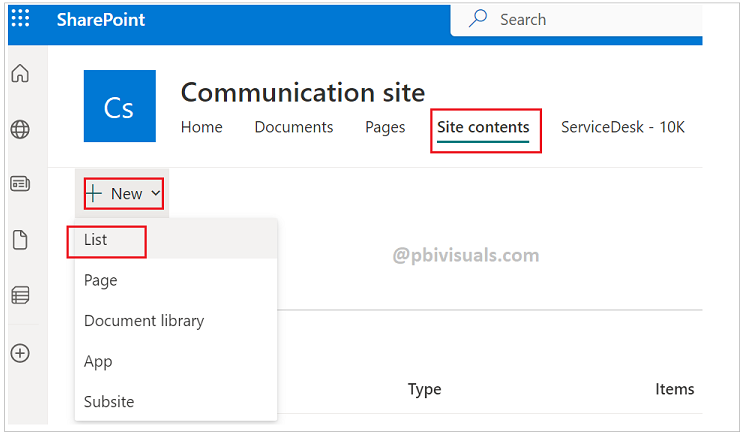
Step-1: Open SharePoint Portal.

Step-2: Now click on Setting Icon > Choose Site contents.

Step-3: Click on +New > And choose List.
Step-4: Now you will see three option to create a list – Blank list , From existing list, From Excel.
Choose third option From Excel >Click on upload > Browse the Excel file
Note: Format your data as a table in excel, if you don’t know how to format as a table? Refer this post.
After that you will see the preview of your data, here you can change the data type of columns.

Step-5: Give the list an appropriate name and by default Site Navigation is checked, uncheck it if you don’t want this list to appear in the navigation menu.

Step-6: Now list has been created and you can see the data.
Copy the URL of this list

Step-7: Now Open the Canvas App> Click on Data > +Add Data > Search SharePoint data source> click on SharePoint

Step-8: If you don’t have any existing SharePoint connection click on +Add a connection else click on SharePoint.
Step-9: Choose connect directly(cloud services) > Connect.
Step-10: Paste SharePoint URL here and click on Connect. After that choose your list and click on connect.

Step-11: Now add one Gallery control and bind the data in Gallery.

Refer more Power Apps post- Microsoft Power Apps
Hope you enjoyed the post. Your valuable feedback, question, or comments about this post are always welcome.
![]()